Integrating HubSpot with Pursuit
Last updated: August 24, 2026
Follow this guide to connect Pursuit to your HubSpot instance.
Introduction
Use this article to connect HubSpot to Pursuit and start syncing contacts. By following this guide, you'll prepare your HubSpot CRM with the necessary fields, connect HubSpot to Pursuit, and configure the integration settings. The instructions are designed for both technical and non-technical users, with clear steps and explanations.
Prerequisites
Before starting, make sure you have the following prerequisites:
Admin access to HubSpot (ability to create custom properties and import data)
An active Pursuit account
Step 1: Prepare Your HubSpot CRM
Before integrating, create the required custom properties in HubSpot to store Pursuit data. This ensures HubSpot can store Pursuit's unique identifiers and additional data.
1a. Create properties
In HubSpot, go to
Settings→PropertiesCreate the following required custom properties:
Critical: Type these fields exactly as shown.
Fields are case-sensitive. Do not change spacing, punctuation, or capitalization. Do not include prefixes or suffixes.
If the names don’t match exactly, the Pursuit ↔ HubSpot sync will fail.
If it’s created with the wrong name you cannot rename or delete it yourself; you’ll have to file a ticket with HubSpot Support and start over.
Once these required properties are created in HubSpot, do not delete them. Deleting these properties will cause errors, and HubSpot will not allow you to recreate them with the same configuration.
Company Properties
The following are the required and recommend fields to add to the company properties.
Inclusion | Property Label | Internal Name (Field Name) | Field Type | Validation Rule |
Required | Pursuit ID |
⚠ Type this field exactly as show | Single-line text | Select "Require unique values for this property" ⚠ Mark this field as unique |
Recommended | Pursuit URL |
| Single-line text or URL | To store a link to the entity’s page on Pursuit |
Recommended | Pursuit Parent ID |
| Single-line text or Multi-line text | The Pursuit ID of the parent entity (if this entity is part of a larger entity; e.g., a city’s parent might be a county). |
Contact Properties
The following are the required and recommend fields to add to the contact properties.
Inclusion | Property Label | Internal Name (Field Name) | Field Type | Validation Rule |
Required | Pursuit ID |
⚠ Type this field exactly as shown | Single-line text | Select "Require unique values for this property" ⚠ Mark this field as unique |
Recommended | Pursuit URL |
| Single-line text or URL | To store a link to the contact's page on Pursuit |
Recommended | Confidence Score |
| Number | Learn about Confidence score |
Critical: Marking these fields as unique is important. It prevents duplicate Pursuit IDs and ensures one-to-one matching between Pursuit and your HubSpot records.
If you don't mark these fields as unique, the integration will fail and you cannot go back to change it later without the help of HubSpot support.
See our Entity fields and Contact fields to see the full list of data fields provided by Pursuit that can be added to your CRM.
1b. Disable HubSpot association
In HubSpot, go to
Settings→Data Management→CompaniesLocate the option “Create and associate companies with contacts.”
This setting controls whether HubSpot automatically associates contacts with company records based on their email domain.
Option 1: Leave Checked (Default Behavior)
If this option remains checked, HubSpot will:
Automatically associate a new contact with an existing company when the contact’s domain matches a company record.
Create a new company record if no existing company has that domain.
In some cases (for example, when an agency changes domains such as from
.orgto.gov), HubSpot may temporarily create a duplicate.These duplicates can be merged easily, and contacts will stay associated with the correct Pursuit account.
This option is useful if you want HubSpot to automatically maintain associations between contacts and companies without manual intervention.
Option 2: Uncheck to Disable Automatic Association
If you uncheck this option, HubSpot will not automatically create or associate companies when new contacts are added. This can help:
Prevent duplicate or inaccurate company records when domains don’t match your existing data.
Ensure all company creation and association are handled manually or through a Pursuit-driven workflow.
Recommendation
Disable this option if your team has a clean, well maintained company list in HubSpot.
Leave it enabled if you rely on HubSpot's automation to link new leads or inbound form submissions to companies.
Just be aware of occasional duplicate that may need to be merged.
Step 2: Connect HubSpot
Note: Pursuit uses OAuth for a secure connection and does not see or store your HubSpot username/password.
With your HubSpot properties and data ready, the next step is to establish the connection between Pursuit and HubSpot:
Initiate connection in Pursuit: Log in to the Pursuit app and navigate to the Integrations section.
Connect to HubSpot: Click the Connect button for HubSpot. This will redirect you to a HubSpot authorization screen.
Authorize Pursuit: In the HubSpot login/authorization window, log in with your HubSpot credentials and grant permission for Pursuit to access your HubSpot data. (You may need to be an admin in HubSpot to authorize third-party integrations.)
Confirmation: After granting access, you will be returned to Pursuit. The connection is now established.
Step 3: Set Export Limits
Configure export limits for your CRM integration.
Record Export Limit
Set the maximum number of records that non-admin users can export to Hubspot at one time.
Unlimited: Allows non-admin users to export all available records.
Custom Limit: Enter a specific number to restrict how many records can be exported in a single action.
Tip: Use export limits to manage data flow and prevent accidental large exports by non-admin users.
Step 4: Schedule Syncs
Pursuit can automatically and incrementally sync data with Hubspot on a schedule you define.
How to Set Up Your Sync Schedule
Select Days: Choose which days of the week Pursuit should sync data with Hubspot. You can select one or multiple days (for example, Monday–Friday).
Set the Time: Pick the time of day you want Pursuit to run the sync. The sync will start automatically at your chosen time.
Confirm Your Timezone: Review the current timezone and update it if needed to match your team’s local or CRM timezone. This ensures syncs occur at the correct time each day.
Save Changes: Once saved, Pursuit will automatically sync your data with HubSpot according to your configured schedule.
Tip: You can adjust your sync schedule anytime to match your team’s workflow or data update cadence.
Step 5: Configure the Mapping
Once connected, configure what data flows from Pursuit to HubSpot and how it maps to your Dynamics fields.
Start configuration — In Pursuit's Integrations section, click the HubSpot Mapping button.
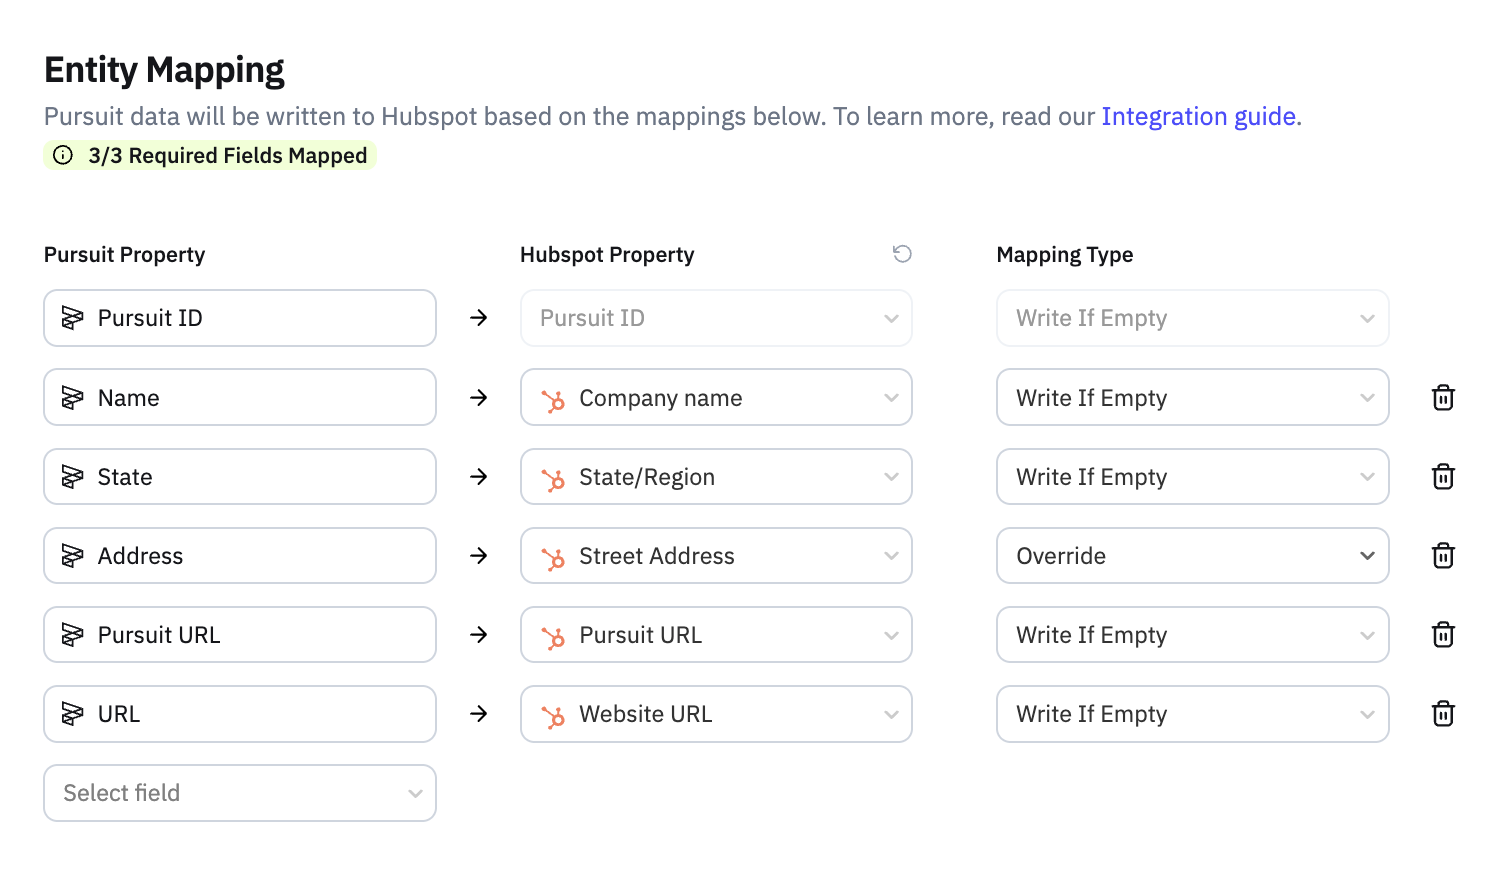
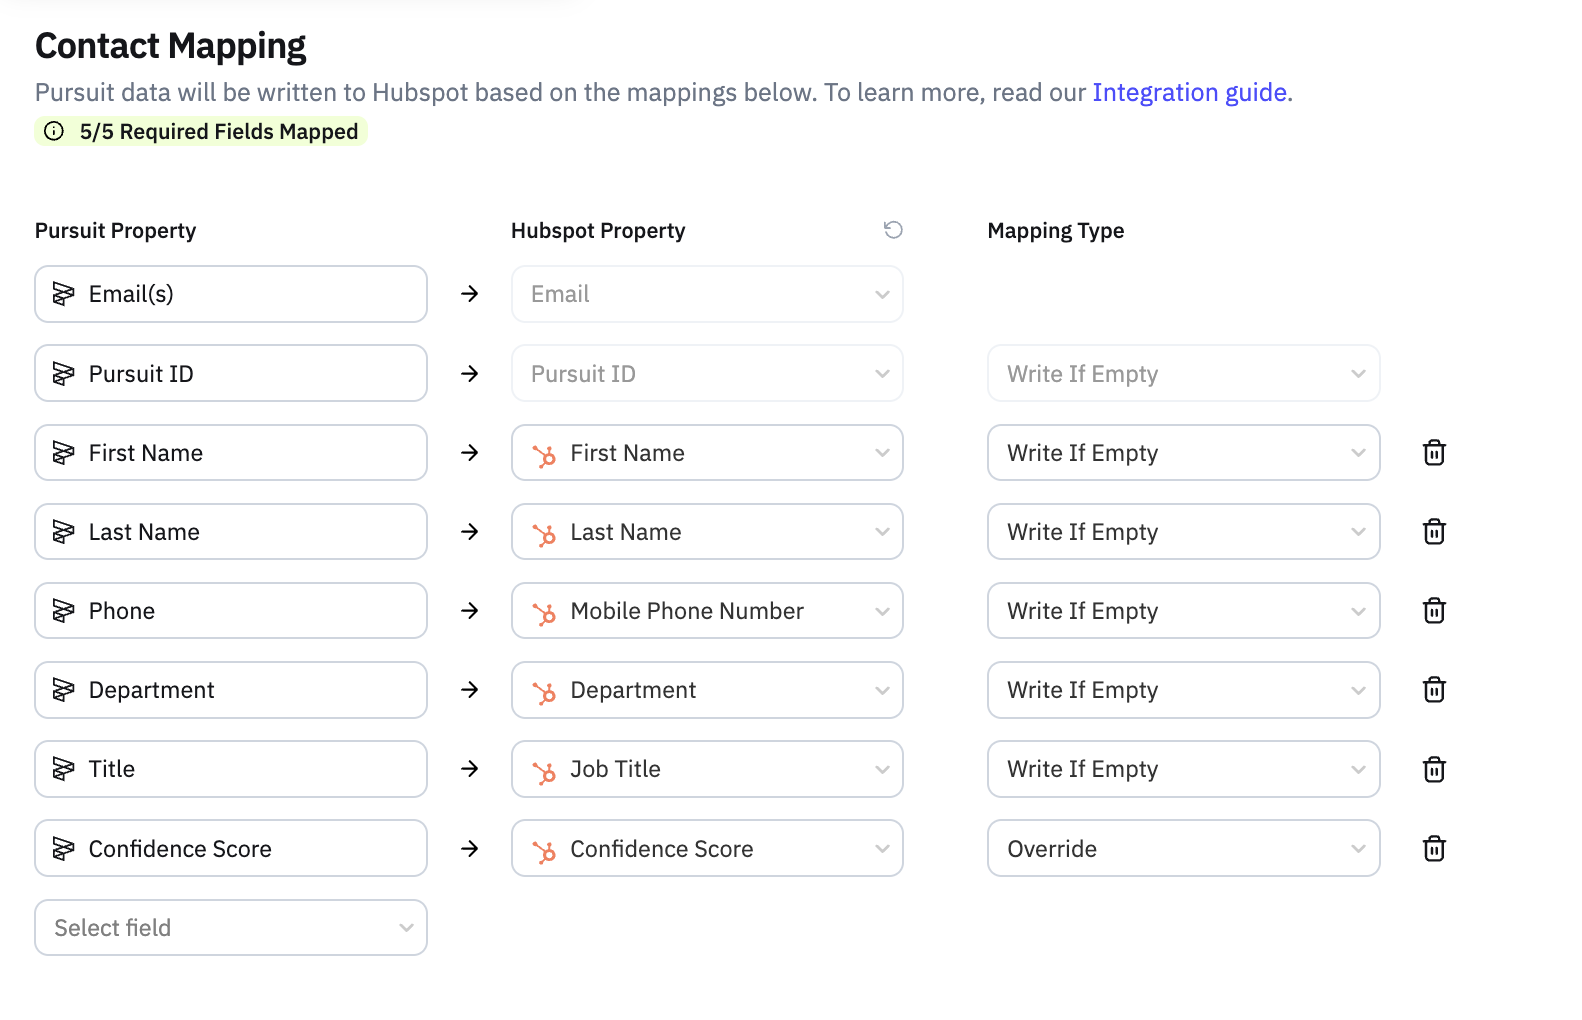
Map Pursuit fields to HubSpot properties
Contact Fields: Email address is used as the unique identifier. Map Pursuit ID to the Pursuit ID Contact field, and Confidence Score to the Confidence Score Contact field.
Entity Fields: Pursuit ID is used to identify the account. Map Pursuit ID to the Pursuit ID Account field, plus any other entity-level fields you want synced.
Static Values (optional): Map a constant value to a field — for example, set "Data Source" to always be "Pursuit" for all records updated by this integration.
Set overwrite preferences — For each mapped field, decide if Pursuit should overwrite existing data. By default, Pursuit only fills in a field if it's empty. Enable Hard Overwrite if you want Pursuit's data to always replace whatever is in HubSpot for that field. We recommend leaving Hard Overwrite off for most fields initially, with the exception of Confidence Score.
Review settings — Double-check that all mappings are correct and the desired fields are set to overwrite or not.
Save integration — Your Pursuit–HubSpot integration is now configured.
Step 6: Configure Filter Properties
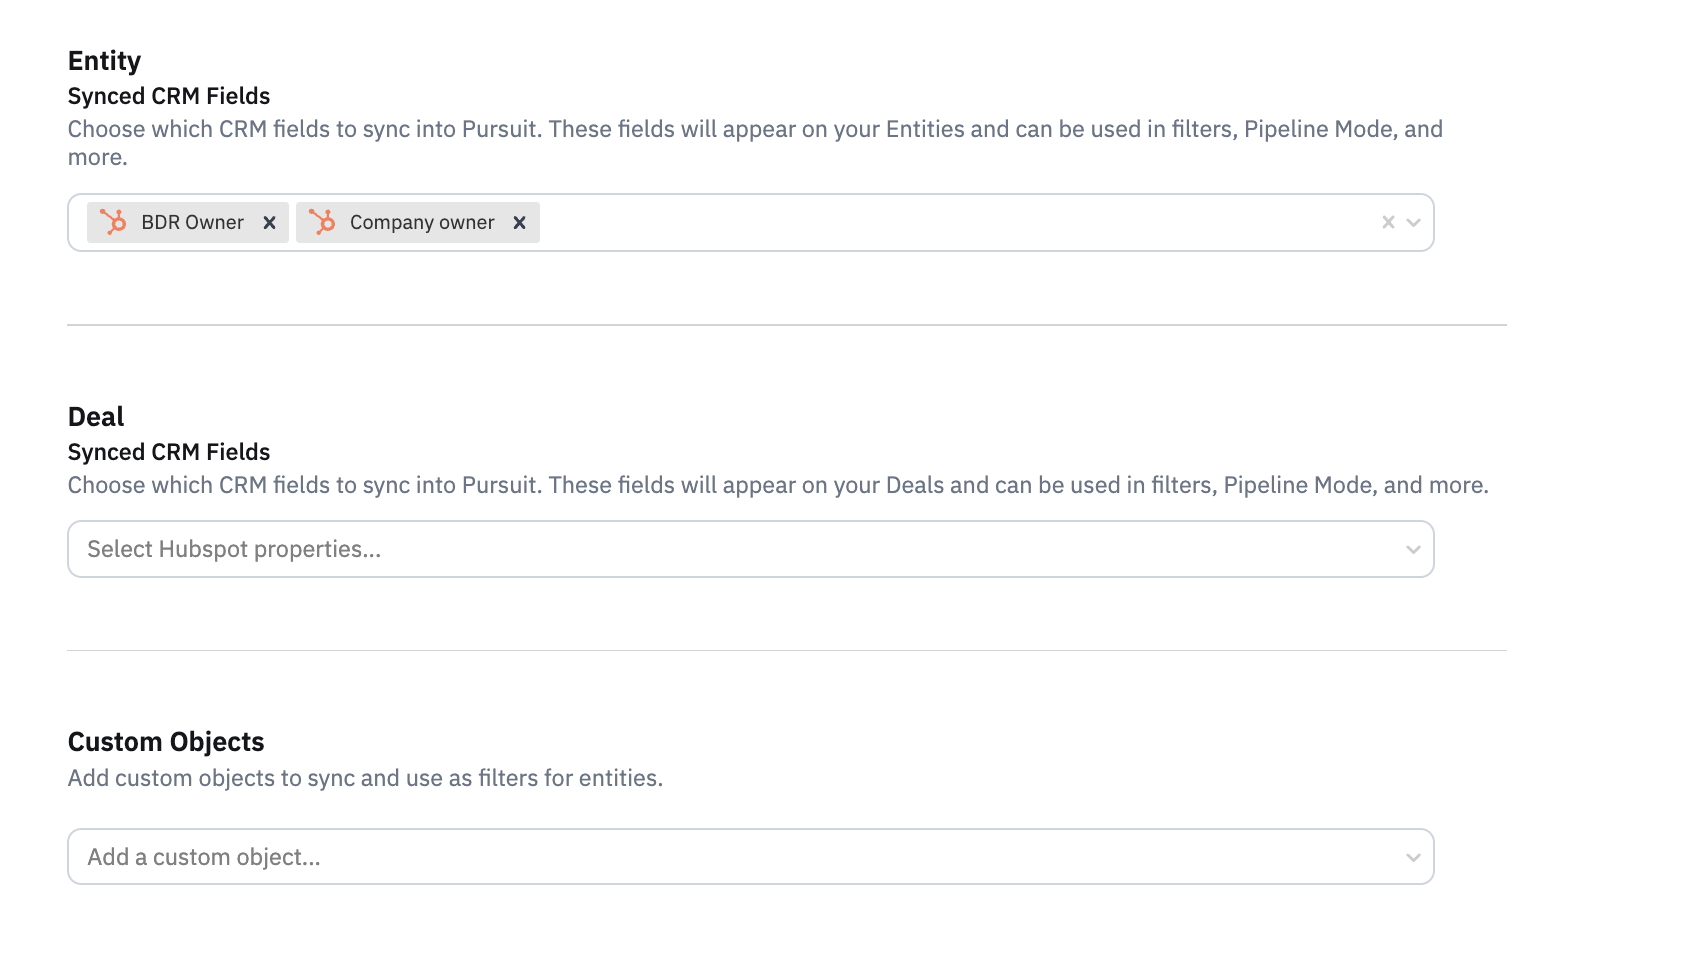
Select the filters you want to import from your CRM to add to Pursuit's existing filters. This allows you to filter Pursuit's dataset by CRM properties directly within the app (e.g., filter entities by "Owner" or "Account Category").
In Pursuit's Integrations section, click the HubSpot Mapping button and click into Account Edit Mapping. Recommended fields to import: Owner, Customer vs. Prospect, Account Category, Industry, or any custom field relevant to your team.
Note: After enabling a new filter property, it may take 10+ minutes for Pursuit to sync all existing values. Once synced, you'll see these filter options in your Pursuit dashboard alongside Pursuit's own filters.
Step 7: Data Enrichment
Account Enrichment
To avoid duplicate records and ensure Pursuit can match its data to your existing Dynamics 365 accounts, bulk-add Pursuit's unique IDs to all your current accounts using Pursuit's Data Enrichment tool.
Create an export: In HubSpot, navigate to Accounts and create a view (or use Advanced Find) that includes: Account ID, Account Name, Address 1: State/Province, Website, and optionally a unique identifier like FIPS Code or Census ID (strongly recommended — improves match accuracy).
Export to CSV: Click Export and save as CSV format.
Enrich Accounts: Follow the Account Enrichment guide, including the step to import enriched accounts back into HubSpot.
Contact Enrichment
To avoid duplicate records and ensure Pursuit can match its data to your existing HubSpot contacts, bulk-add Pursuit's unique IDs to all your current contacts.
Create an export: In HubSpot, navigate to Contacts and create a view that includes: Contact ID, First Name, Last Name, Company Name (Parent Account), Address 1: State/Province, and optionally Email, Job Title, or Company Website.
Export to CSV: Click Export and save as CSV format.
Enrich Contacts: Follow the Contact Enrichment guide, including the step to import enriched contacts back into HubSpot.