Integrating Salesforce (SFDC) with Pursuit
Last updated: May 23, 2026
Introduction
This guide provides step-by-step instructions to integrate Pursuit with Salesforce (SFDC). By following this guide, you'll prepare your Salesforce CRM with the necessary fields, connect Salesforce to Pursuit, and configure the integration settings.
API-Only Integration User
Why use a dedicated API-Only Integration User?
No additional cost: Most Enterprise, Unlimited, and Performance orgs receive five free “Salesforce Integration” user licenses (Developer orgs get one).
Security: The “API Only” profile blocks browser log-ins and lets you grant only the objects and fields your integration needs. This limits blast-radius and simplifies compliance.
Clean audit trail & rollback: All Pursuit traffic originates from one user, so you can isolate, monitor, and roll back changes quickly if something goes wrong.
Step 1: Create & Configure the Integration User
Prerequisite: You must be a Salesforce System Administrator, and have at least one unused Salesforce Integration user license.
Set up user
Open Salesforce Setup: Click the Gear icon (⚙) → Setup
Navigate to Users: Go to Users → Users → Click New User
Fill in required fields
User License: Select Salesforce Integration
If it’s not available, all free integration licenses may already be in use
Profile: Select Salesforce API Only System Integrations
In newer orgs this may be: Minimum Access – API Only
Save
Note: UI login is blocked for API-only users
Grant the Right Permissions
Create a Permission Set
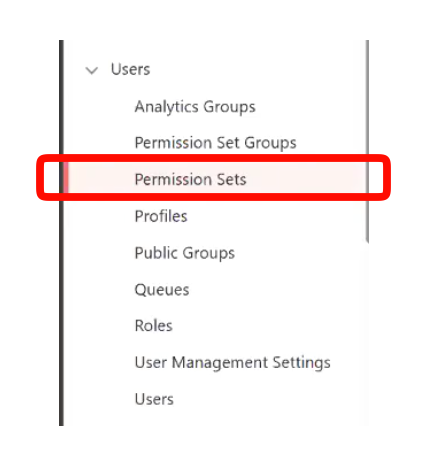
Go to Setup → Permission Sets → Click New
Label: Salesforce API Integration
License: Salesforce API Integration
Click Save
In the Permission Set, open
Object Settingsand enable at minimum:Accounts: Read, Create, Edit, View All
Contacts: Read, Create, Edit, View All
Any Pursuit-specific custom objects (optional)
Assign the Permission Set to the Integration User
Go to Setup → Users
Click the name of the Salesforce Integration user
Select the Salesforce API Integration permission set
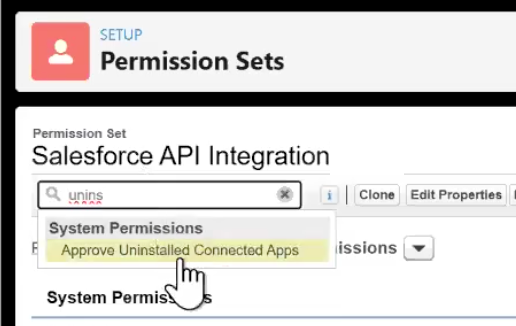
Find Approve Uninstalled Connected Apps and enable it
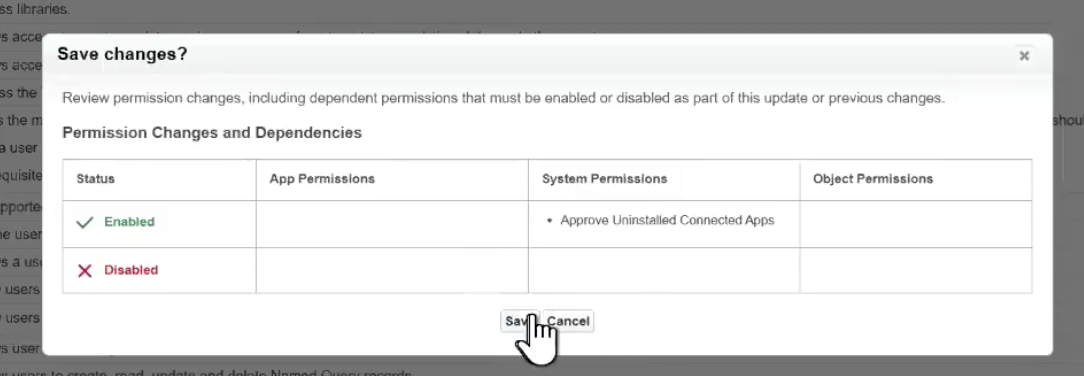
You'll receive a confirmation message from Salesforce once done
Step 2: Prepare Your Salesforce CRM
Before integrating, create the required custom properties in Salesforce to store Pursuit data. This ensures Salesforce can store Pursuit's unique identifiers and any additional data.
Create required fields
In Salesforce, go to Object Manager → Account → Fields & Relationships, and create the following required custom fields:
Type these fields exactly as shown.
Fields are case-sensitive. The API name must be lowercase.
Do not change spacing, punctuation, or capitalization. Do not include prefixes or suffixes (e.g. pursuit_id_company)
If the names don’t match exactly, the Pursuit ↔ Salesforce sync will fail.
Entity Type | Field Label | API Name ** | Field Length | Field Type | Validation | External ID |
Account | Pursuit ID | pursuit_id | 25 | Text | Select "Unique" field | Select "True" |
Contact | Pursuit ID | pursuit_id | 25 | Text | Select "Unique" field | Select "True" |
** Note: Once you create the new fields, Salesforce will automatically append __c to the end of the newly added API names (e.g. You will type pursuit_id and Salesforce will update that to pursuit_id__c. This is expected and correct
A few important reminders:
Marking these fields as unique is important. It prevents duplicate Pursuit IDs and ensures one-to-one matching between Pursuit and your Salesforce records.
Once these required properties are created in Salesforce, do not delete them. Deleting these properties will cause errors, and Salesforce will not allow you to recreate them with the same configuration.
Create recommended fields
Pursuit can provide additional data about entities and contacts. You may want to create the following recommended fields to capture this information in Salesforce (to see the full list of data fields provided by Pursuit, see our 📄 Entity Fields Reference and 📄 Contact Fields Reference)
Field Type | Field Label | API Name | Field Type |
Account | Pursuit URL | pursuit_url | URL |
Account | Pursuit Parent ID | pursuit_parent_id | String, Textarea |
Contact | Pursuit URL | pursuit_url | URL |
Contact | Confidence Score | confidence_score | Number |
Step 3: Connect Salesforce and Pursuit
With your Salesforce fields and data ready, the next step is to establish the connection between Pursuit and Salesforce.
Sign into the API-Only Integration User from Salesforce
Follow these steps prior to initiating the connection in Pursuit to ensure you are connecting to the Integration User.
In Salesforce Setup, Navigate to Users
Go to Users
Find the Integration User you just created
Click on the Integration User to open the profile page for that user
Click on
Loginon the Integration user profile page to log into the API-Only Integration User

Look for the banner at the top to confirm you are logged in as the Integration User

This will now ensure that when you initiate the connection from the Pursuit integrations tab, that you will connect to SFDC using the Integration User (with appropriate permissions) rather than your own personal admin account.
Initiate the connection in Pursuit
Log in to the Pursuit platform
Navigate to the Integrations section (
Settings→Integrations)Click Connect to Salesforce
This will redirect you to a Salesforce authorization screen.
Authorize Pursuit
In the Salesforce login/authorization window you will now be to log in using the API-Only Integration User
Confirmation: After granting access, you will be returned to Pursuit. The connection is now established.
Note: Pursuit uses OAuth for a secure connection and does not see or store your Salesforce username/password.
Step 4: Set Export Limits
Configure export limits for your CRM integration.
Record Export Limit
Set the maximum number of records that non-admin users can export to Salesforce at one time.
Unlimited: Allows non-admin users to export all available records.
Custom Limit: Enter a specific number to restrict how many records can be exported in a single action.
Tip: Use export limits to manage data flow and prevent accidental large exports by non-admin users.
Step 5: Schedule Syncs
Pursuit can automatically and incrementally sync data with Salesforce on a schedule you define.
How to Set Up Your Sync Schedule
Select Days: Choose which days of the week Pursuit should sync data with Salesforce. You can select one or multiple days (for example, Monday–Friday).
Set the Time: Pick the time of day you want Pursuit to run the sync. The sync will start automatically at your chosen time.
Confirm Your Timezone: Review the current timezone and update it if needed to match your team’s local or CRM timezone. This ensures syncs occur at the correct time each day.
Save Changes: Once saved, Pursuit will automatically sync your data with Salesforce according to your configured schedule.
Tip: You can adjust your sync schedule anytime to match your team’s workflow or data update cadence.
Step 6: Configure the Integration
Once connected, you can configure what data flows from Pursuit to Salesforce and how it maps to your Salesforce fields.
Start configuration: In the Pursuit app’s Integrations section, click the Salesforce Mapping button to set up the integration details.
Map Pursuit fields to Salesforce fields: You will see a list of Pursuit data fields that can be synced. For each field, choose the corresponding Salesforce field to map it to. Key mappings to set:
Contact Fields: Email address is used as the unique identifier. Pursuit will not create a duplicate contact if it finds a contact with the same email in Salesforce.
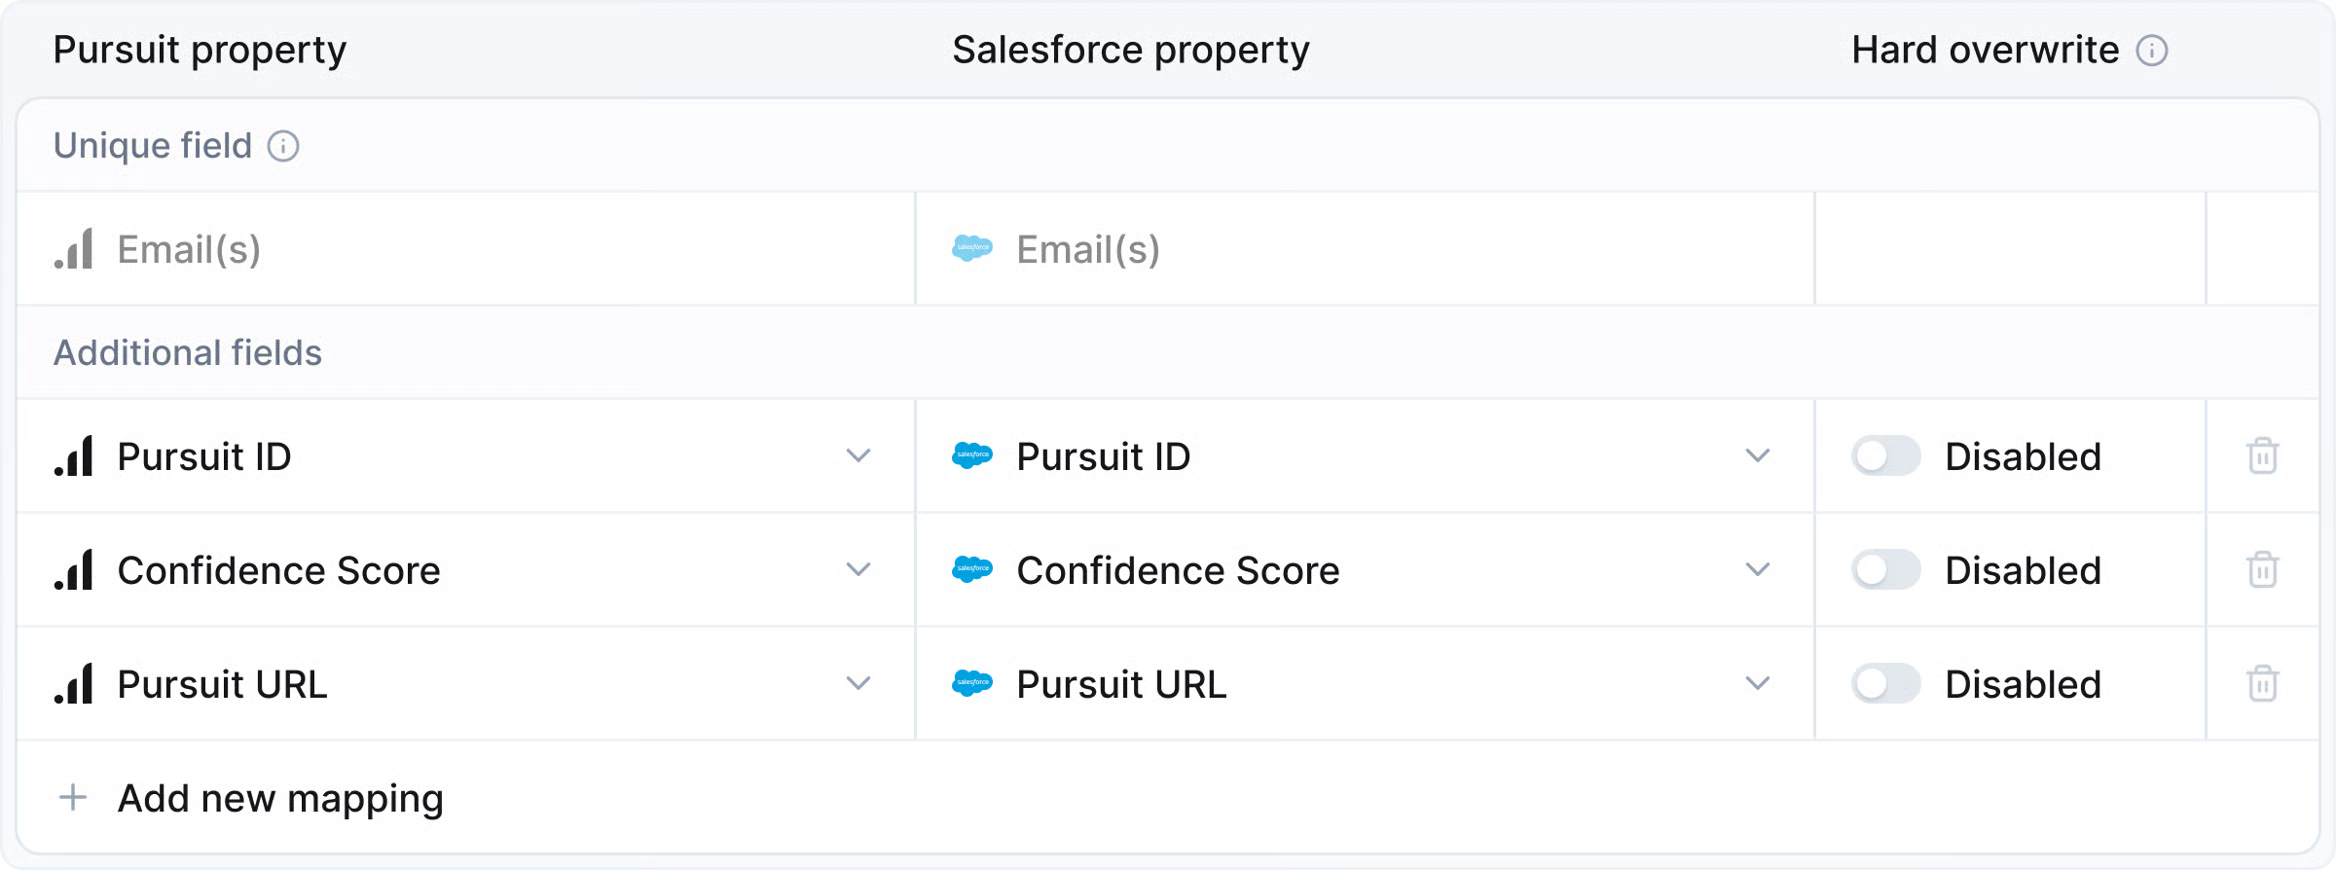
Map Pursuit ID (Pursuit) to Pursuit ID (Salesforce Contact field) – this ensures updates match the correct contact.
Map Confidence Score (Pursuit) to Confidence Score (Salesforce Contact field.)
Map any other contact-level fields you want (e.g., title, phone, etc.) that you want Pursuit to update in Salesforce. (Ensure each is mapped to the correct Salesforce Contact field.)
Entity Fields: Pursuit ID is used to identify the company. If a Pursuit ID isn’t found, you may also opt to match on an alternate ID like Power Almanac ID if available.
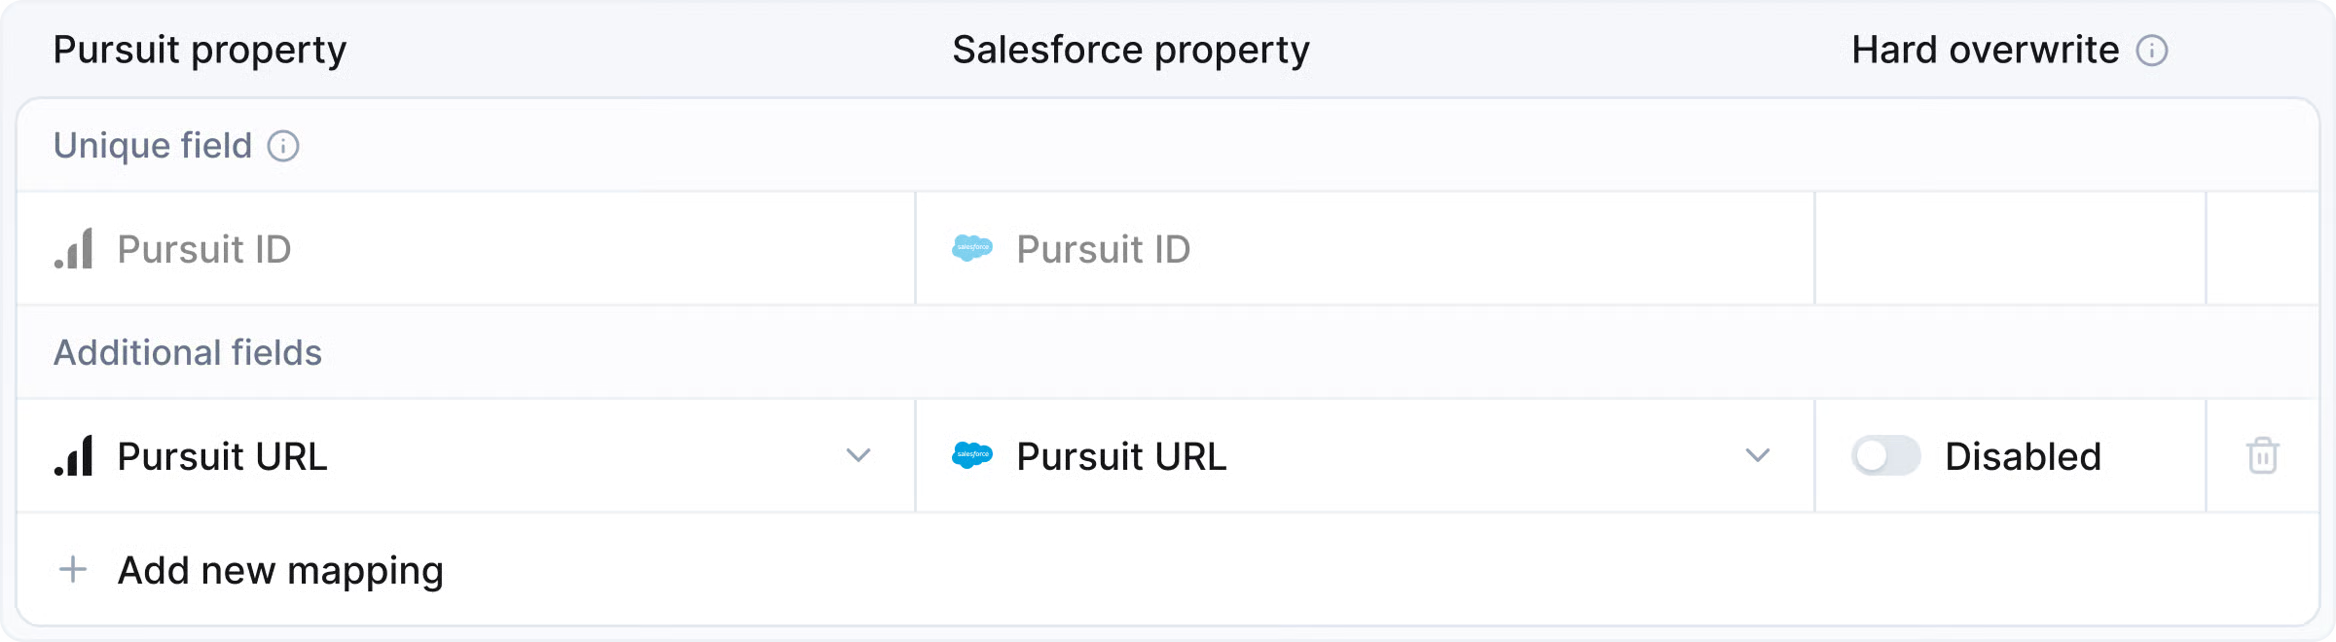
Map Pursuit ID (Pursuit) to Pursuit ID (Salesforce Account field) – this ensures updates match the correct account.
Map any other entity-level fields you want (e.g., population, state, etc.) that you want Pursuit to update in Salesforce. (Ensure each is mapped to the correct Salesforce Account property.)
Static Values (optional): Pursuit allows mapping of a constant static value to a field. For example, you could set a field like "Data Source" to always be "Pursuit" for all records updated by this integration.
Set overwrite preferences: For each mapped field, decide if Pursuit should overwrite existing data in Salesforce:
By default, Pursuit will only fill in a field if that field is empty in Salesforce (or provide new information). If you want Pursuit’s data to always replace whatever is in Salesforce for that field, enable the Hard Overwrite toggle for that field.
Example: If you trust Pursuit to maintain the most up-to-date population count, you might turn on Hard Overwrite for the "Population" field so that it always updates to Pursuit’s latest data, even if you already had a value in Salesforce.
We recommend leaving Hard Overwrite off for most fields initially, so that Pursuit adds missing data without overwriting your existing information unless it's new.
Review settings: Once you’ve mapped fields and set your preferences, review the configuration summary. Double-check that all mappings are correct and the desired fields are set to overwrite or not.
Save integration: Save the integration setup in Pursuit. Your Pursuit–Salesforce integration is now configured!
Step 7: Configure filter properties
Select the filters you want to import from your CRM to add to Pursuit’s existing filters. This allows you to filter Pursuit’s dataset by CRM properties directly within the Pursuit app (e.g., filter entities by your CRM field "Contact Owner").
In the Pursuit app’s Integrations section, click the Salesforce Mapping button and scroll down to Filter Properties to select the Salesforce properties you want to import.
Recommendations: you might want to filter Pursuit’s dataset by fields like "Lifecycle Stage" , "Customer", "Prospect", "Owner ID" or any custom flag from your Salesforce.
If you add filter properties, Pursuit will pull those field values from Salesforce on a regular basis (once a week or immediately after each export) and incorporate them into the Pursuit app’s filters.
Note: After enabling a new filter property, it may take some time (10+ minutes, depending on number of records) for Pursuit to sync all existing values. Once synced, you’ll see these filter options in your Pursuit dashboard, alongside Pursuit’s own filters.