Account matching and account enrichment
Last updated: September 25, 2026
Enrich your accounts with Pursuit data
Using the Data Enrichment area, the platform can enrich your existing accounts by matching your data to Pursuit's database. The enriched data will include a unique Pursuit ID for each matched account, along with additional data fields (see 📄 Entity Fields Reference for the full list.)
Common Use Cases
Common use cases for uploading an account list and enriching it with Pursuit:
manually matching accounts between your CRM and Pursuit
using a list of accounts as a filter when finding opportunity signals
enriching a marketing campaign target list with more account-level insights from Pursuit or finding a list of target contacts for those accounts
Prepare your file
The Data Enrichment tool only accepts CSV files. It requires certain mandatory columns, and other recommended fields to improve the match rates.
Required Columns
Entity Name: The account name
State: The account state
Strongly Recommended (improves match)
Unique ID: Any unique identifier your organization uses for companies. These identifiers significantly improve match accuracy. See list below.
LEA ID
NCES ID
FIPS Code
ORI ID
PSAP ID
FDID
Website
Start the account enrichment process
Once your file is ready,
Click on Data Enrichment in the purple lefthand navigation bar
Click New Data Enrichment and select Account Matching.
Upload (or drag and drop) your prepared CSV file
Map the fields: The tool will ask you to map your CSV columns to the fields Pursuit needs.
Entity Name: Map to your account name column.
State: Map to your account state column.
If you have a website or unique ID column (e.g., FIPS or other ID), map it to the corresponding field.
Run the enrichment
Pursuit will now match your records and append enriched data from from Pursuit (including the Pursuit ID for each matched account)
Review and download results
The enriched dataset will be sent via email once processed. It will include your original data (all the way to the right of the file) plus the new Pursuit data
Understanding the matching results
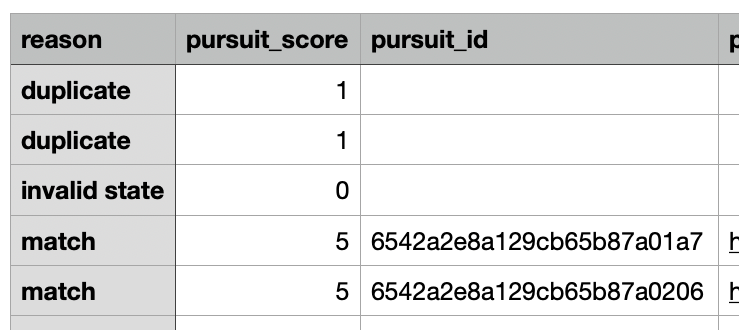
Each record comes back with two key columns, and they are the best place to start:
Pursuit Score: Each row is assigned a
pursuit_scorethat indicates the confidence and match success between the account listed (each row) and a corresponding account in Pursuit.Reason: Each row is also assigned a
reasonto explain, in brief, why thatpursuit_scorewas assigned to that row.
Score Range | Action(s) |
4 or 5 | High match rates / confidence These accounts are available to use in filtered lists and/or are automatically mapped back to your CRM (if you used the automated account matching option). |
1 - 3 | Review and clean up the data to remove any false matches, or adjust the data to increase the match rate. |
Reviewing accounts that did not match
Only matched accounts appear enriched.
Scroll all the way to the right on the sheet. Your originally uploaded fields are there, usually prefixed with crm_. This will not give you a row-by-row reason, but it lets you see your source data alongside the results and look for patterns.
What a 0 usually means
One of the required matching fields did not map correctly (account name or state abbreviation),
The record is not a governmental entity.
The entity is in a country not currently covered by Pursuit
What a 1 usually means
The row is a duplicate of another row that already matched, or
The required fields are present but the record still could not be matched.
Common reasons an account does not match
A few patterns account for most non-matches:
NGOs and adjacent organizations will not match, since matching is limited to government entities
Federal entities should use
FEDas the state abbreviationSchool districts will match, but individual schools will not
Entities outside a covered country will not match. Matching is focused on those countries where Pursuit has data coverage.
Cleanup Process
In case of inaccurate or unmatched records, there may be some cleanup required to get your data in the best possible shape. Follow these instructions:
Matched accounts
Review records with a match score of 1-3
Validate accuracy
Remove false matches
Unmatched accounts
Ensure these fields are complete and correct: Account Name, State, Website, FIPS, NCES ID, FDID
If you have a data team, consider exporting the Pursuit account data and having them manually assign Pursuit IDs to any unmatched accounts.
Re-Import Cleaned Data
With Initiate Matching, accounts scored 4 or 5 map to your CRM automatically. You can run it on all unmatched accounts or only on accounts that meet CRM field conditions, such as a single territory.
Import Enriched Accounts to your CRM
If you used the Initiate Account Matching option on the CRM, integration, accounts scored 4 or 5 will automatically be mapped back to their respective accounts in your CRM.
If you opted to manually match accounts or are manually cleaning up accounts to increase the match rate, then you can manually update / add accounts back to your CRM using these steps:
HubSpot
Setup: Read Step 1 of the 📄 Integrating HubSpot with Pursuit guide to ensure your account is set up correctly.
Import: In HubSpot, go to Companies and import the enriched CSV. When choosing how to import Companies, if your original dataset was exported from HubSpot including a Record ID, select Update existing Companies only (since these companies already exist in your HubSpot). HubSpot will ask you to map the columns in your CSV to HubSpot properties. Ensure you map:
Pursuit ID: Map the "Pursuit ID" column to the custom Company property "Pursuit ID" that you created.
Map any other Pursuit-provided fields you want to import, such as population, etc., to their respective HubSpot properties if you have them.
Complete import: Execute the import process to update each company record by filling in the Pursuit ID (and any other mapped fields).
Salesforce (SFDC)
Setup: Read Step 1 of 📄 Integrating Salesforce (SFDC) with Pursuit guide to to ensure your account is set up correctly.
Import: In Salesforce Setup, open Data Import Wizard (or use Data Loader if you prefer for bulk updates). Select Accounts as the object and indicate that the import is to update existing records (if your original dataset was exported from Salesforce). Salesforce will ask you to map the columns in your CSV to Salesforce fields. Ensure you map:
Pursuit ID: Map the "Pursuit ID" column to the custom Account field "Pursuit ID" that you created.
Map any other Pursuit-provided fields you want to import, such as population, etc., to their respective Salesforce properties if you have them.
Complete import: Execute the import process to update each account record by filling in the Pursuit ID (and any other mapped fields).
Tips and Tricks
Use a parent-child naming convention to increase match rates
If any of your accounts include a parent jurisdiction in their name, you can use Pursuit's parent-child matching format: <Entity Name>, <Parent Entity Name> in the name field.
Example: Instead of just "Adamsville", use "City of Adamsville, Jefferson County". Here "City of Adamsville" is the entity and "Jefferson County" is the parent. This helps Pursuit distinguish entities with similar names by their parent organization or region.
Important: Use commas only to separate an account name from its parent name (as in the format above). Avoid using additional commas in the name, to prevent confusion in the matching system.
Use Unique IDs
Include supported unique identifiers (e.g. FIPS code, NCES ID, LEA ID, ORI ID, etc.) where possible to raise match rate confidence.